Search

17-18 Classroom Tour

17-18 Classroom Tour

This year's theme is all things cactus and distressed barn wood! I love that I was able to create a space where my students feel welcomed and at home. Let's begin the tour!

Classroom Design Tip 1: Add lights!
I have lights around my library, storage shelves, and my front bulletin board. I find that by the end of the day, students eyes are tried and strained from being exposed to fluorescent lighting all day long. Not only do they replace the fluorescent lighting, but they help create a space that is calm and inviting. I always give my students the option between the LED or fluorescent, but 9 times out of 10 they choose the LED. You can grab them here!

Classroom Design Tip 2: Library should be front and center!


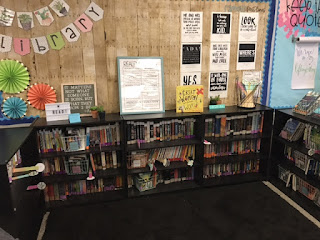
 Whether you have 50 books or 500, your library should be the main focus of the classroom. You want this space to be inviting and homey for your students. Adding a rug or pillows can help! It has taken me 5 years to get to this point, but it has always been a goal of mine to have a large library where multiple chairs, pillows, and students can fit! Honestly, the hardest part about having a classroom library is how to organize it! I went from organizing it by level to only by genre and I am so happy I did. Taking away the level focus has changed the reading climate in my classroom. Give your students the choice to choose whatever book their little hearts desire. You'll be happy you did!

Classroom Design Tip 3: Student sitting area
MY STUDENTS LOVE THIS AREA! I allow my students to sit anywhere when they are working independently or with partners. I waited until the end of summer to purchase the blue beach chairs from target and I snagged them for $5!! So worth the wait and so cheap! As you can see, I only covered one of the chairs with a cute book print..I've been meaning to cover the other...
The Big Joe chair is from Walmart! It's very durable and comfy! Table was spray painted to match decor and can be found at Ikea.


 Classroom Design Tip 4: Student Centered Bulletin Boards


When designing your classroom, you want to keep the students in mind! Your students should be able to interact or help create each one. Placing student birthdays on the wall is a great way to show you care and are prepared to celebrate their special day! Target's mini balloons were a perfect addition. I traced the balloons using my Smart Board! 

 Our "Goal Diggers" bulletin board is definitely one of my favorites! I love that my students have a space to display their goals (academic or personal)! It was a perfect way to start building our classroom community too. I plan on adding their photos to the bottom...just haven't gotten to it yet!

Keep the quote was inspired from Miss 5th! When I saw it on Instagram last year I knew I had to bring it into my own classroom. Each week, I have a student present the quote of the week and we discuss its meaning and importance! You can find Miss 5th's original post here!


  More bulletin boards! 
 "Currently" bulletin board is from Texas Lone Star Teacher
"Readers Dig Deep" bulletin board can be found here.
Classroom norms were adapted from Ron Clark's Essential 55

 Classroom Design Tip 5: ADD A STAGE!
The classroom stage is all the hype right now and I am all for it! I only spent $60 bucks at my local Home Depot! 

Cactus decor is from Purely Primary 

Thanks for stopping by! If you have any questions please comment below!

Hogwarts Floating Letter Display


I know many of you have been waiting patiently for this blog post! I finally found some time to sit down and hammer it out. Listed below are all the details you need to create your own display. 

STEP ONE: MATERIALS
-Brown craft paper from  Michaels
-White printing paper
-regular & double sided tape
-Fishing line
-Wooden rods from Michaels (Look in the kid craft section)

STEP TWO: PRINT
*Please ignore the spelling errors of "Privet" & "Drive" in the direction pictures. For some reason the font switches up the 'w' and the 'v'. This error has been fixed on the printable.*
This took a lot of time. For some reason my printer hates this type of paper and I could only print under "professional paper" as my setting. Be sure to try it out before printing all of the letters.
-----------------------------------------------------------
I have provided the template for the letter and the wax seal and a printable tutorial! Grab it here. OTHERWISE, read all the deets below!
 
Here is what your paper will look like when it prints. One side was very light for me so I traced over it with a pencil. You will need good light for this.
-----------------------------------------------------------
STEP TWO: BUILD THE LETTER(S)
This will take some time, but it is totally worth it! I PROMISE!
Step one: Fold each wing so that the folds go away from the address.

 
Step two: Tape down the fishing line. You want a pretty long piece! Leave enough empty fishing line at the top so you can tie it to the wooden rod at the end. You can change up the direction of the fishing line but always tape it down as a diagonal! Cut off any access at the bottom.

 
Step three: Tape down each wing. The flap with the Hogwarts emblem should be taped down last. 


 Step four: Secure the final wing and use double sided tape for the wax seal!

 Step five: Add as many letters to one piece of fishing line! I would switch up between a group of 3, 4, 5 & 6! 
-----------------------------------------------------------
STEP SIX: CREATE DISPLAY
This is the fun part...SEEING IT ALL COME TOGETHER! My Harry Potter lovin' heart skipped a beat when I saw the final product. Have fun with it! You can add as much or as little as you want. You will attached the top part of your fishing line to the wooden rod. I always tied a double knot! Then, arrange the distance between each letter column. Switch up the fishing line letter lengths. This will help create depth to the display. 
-----------------------------------------------------------
STEP SEVEN: SECURING THE DISPLAY
This is what worked for me! I use tacks for to hang anything from my classroom ceiling.  Look at the pictures below to see what I am talking about. 

I placed the tack between the end fishing line and looped it through. Then, I found a strong spot in my ceiling. Get help with this!  For me, I crisscrossed my wooden rods. You can also do them in rows! Either way works. Do it to both ends of your rods and you should be good to go. You could also use fishing line and string it through your sealing title holders (I don't know the actual name of this, LOL) Be sure your rods are secure & ENJOY!
-----------------------------------------------------------
I want to give a HUGE shout-out to my local Half-Priced Books. I saw a display similar to this and it about blew my mind. I emailed the store and the employee who made it show me how to do it! Check out her display here.

I also wanted to thank you for all of your love and support with my classroom design. I love creating a space that not only I love, but my students will too!

ENJOY!!